
Last summer I spent just about every sunny day out on my back deck. It was very nice to work from home while sitting outside with my laptop, listening to the birds. And it was even more lovely in the evenings, listening to the chittering of dozens of chimney swifts swooping overhead.
Except…my yard is very tiny, and my neighbors are very close. And they practically live outside. There’s a fence between our yards, but my deck is higher than that, so when I’m sitting on it I’m highly visible. Their patio is shaded by a pergola with lush hanging vines, so they can see out easily, but I can’t see them. Listen, I have a thing about being watched, and sometimes I just want to sit outside without feeling like I’m on stage.

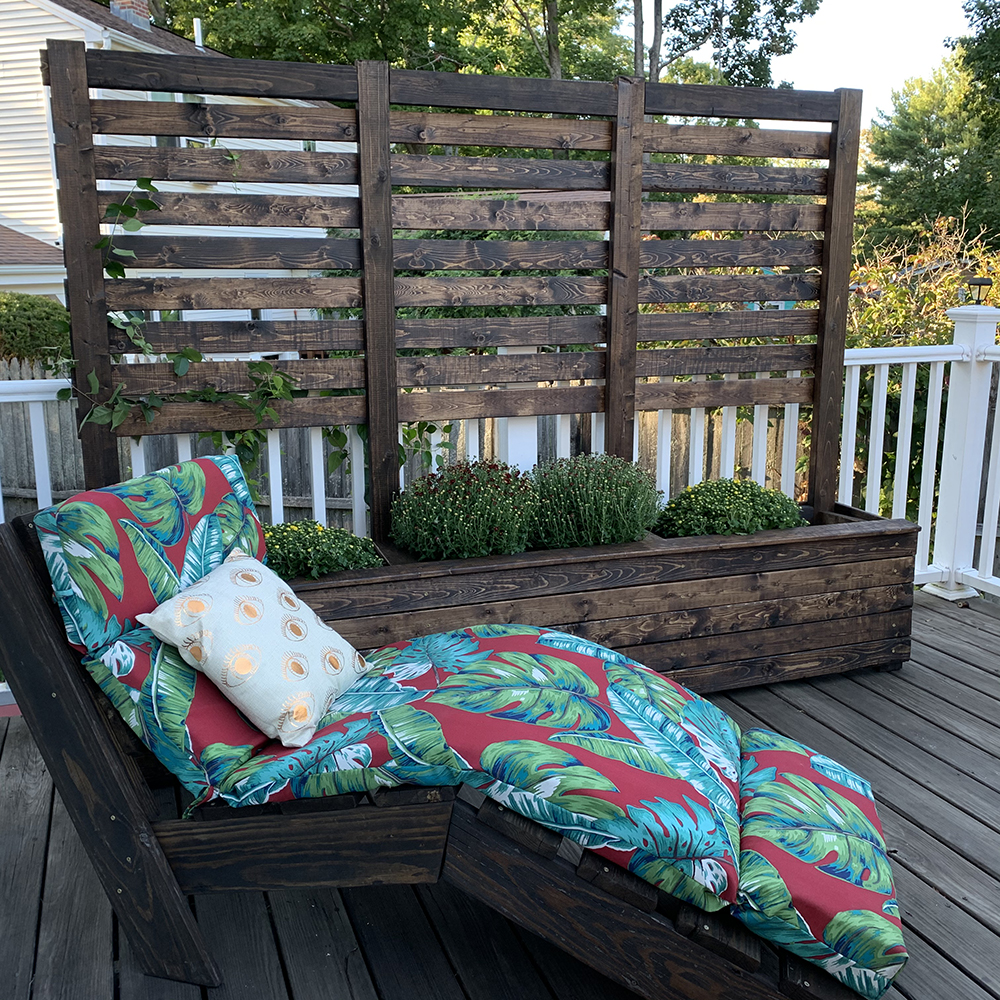
After a lot of brainstorming, I finally decided to build myself a privacy screen/trellis. It’s unfortunate that I waited so late in the season to do it, because I never got to use it much, but I’m very glad I have it for the upcoming spring.

My inspiration was the IKEA Äpplaro¨ bench and wall panel. It was exactly the look I was going for, but I’d need to buy three of them and I was fairly certain I could do it cheaper myself. I also wanted it to be a trellis with planters at the base instead of a bench. Sooooo I designed it myself.
The design is fairly simple, and in total it came to roughly $165. This included:
- 24 eight-foot furring strips @ $3 each = $75. It took a while to pick through all the stock at Lowe’s and get straight ones without huge knots. You could use 1×4″ cedar or something else but furring strips are cheap.
- 7 twelve-foot 2x4s @ $9 each = $63.
- 2″ exterior wood screws, 1 box of 125 screws for $10.
- 1 qt of wood stain @ $8
- 1 qt of polycrylic @ $18
Tools:
- Drill/screwdriver
- Saw (I used a circular saw. A miter saw would probably be better. But you could also hand saw it if that’s what you have.)
- Orbital sander (or you can sand by hand).
- A pocket hole jig would be nice if you have one. I don’t, so I just drilled in at an angle, which was very sloppy but it worked.
Cut list:

2x4s:
- four 62″ back posts
- four 18″ front posts
- eight 16″ front-to-back braces
- twelve 27.33″ side-to-side braces

Furring strips:
- nine 8′ strips for back trellis
- five 8′ strips for front of planter
- five 8′ strips for back of planter
- two 8′ strips for top edge of planter front and back
- two 16″ strips for top edge of planter left and right
- ten 17.5″ sections for sides of planter
I stained and sealed all the pieces before assembly. Since the furring strips weren’t pressure treated, I figured it would be best to make sure every inch of them were covered in the polycrylic.

I knew that I’d never be able to move the thing once I put it all together, so I assembled it in place. Using clamps helped with this immensely, since I was doing it by myself.

You’ll notice that the planter sections don’t have bottoms. I hadn’t decided what to do with those, so that’s not in the plans. You could cut short sections of 2x4s to brace across the frame to hold up plant pots. Or you could a more solid bottom and line it with plastic, then fill the whole thing with dirt, making sure there are holes for drainage. That might be better at anchoring the whole thing down in high winds.
The winds are actually the main issue with this trellis. Although the furring strips around the planter part are butted up against each other, the ones for the trellis in the back have a 1 or 1.5″ space in between. If you get high winds, you might want to space them further apart. Since I wanted the privacy, I put them closer together, and this ended up blowing over in a winter storm. However, there was no soil in it at the time, which might have made it too top heavy. I intend to anchor it to my deck somehow once I actually get around to using it this summer.

I’m excited to use this soon. I found plastic planters that fit inside the holes perfectly, and I plan to grow morning glories. This should give me a relaxing, private place to chill this summer.
