
I have kind of an addiction to picking up furniture I see on the side of the road. Every time I leave the house, I keep an eye out for stuff that’s been left on the curb to see if there’s anything good, and every so often I find a gem. Restoring furniture that I got for free is a ton of fun because I can do whatever I want to it without fearing that I’m going to ruin it. After all, it was intended to be thrown away, so who cares what I do to it?
That’s how I ended up with this newest project. Someone had left a table on the curb that had probably once had a glass top. Since the inset was an odd shape, I’m sure there was no way to cheaply replace the glass, so they were throwing it away.

The table was topped with a thin veneer that had suffered water damage and was very warped. This was worst in the four rosettes at each corner. The rosettes had swollen and separated into layers, and in doing so had pulled up the veneer around them. Luckily they weren’t glued on, or possibly the glue had failed, so it wasn’t difficult to pry them up.

I measured the rosettes and found them to be 2.75″, so I bought four from Lowes that were the same size, although I couldn’t find the exact design. Of course when they arrived, they were about a millimeter larger than 2.75″ so I ended up having to sand all of them down.
I also bought a 1/2″ thick hardwood board so that I could close up the hole where the glass used to be. This turned out to be just an inch or so short on one side, but I was able to use the scraps to fill in the gaps, and then wood filler to cover any small holes.


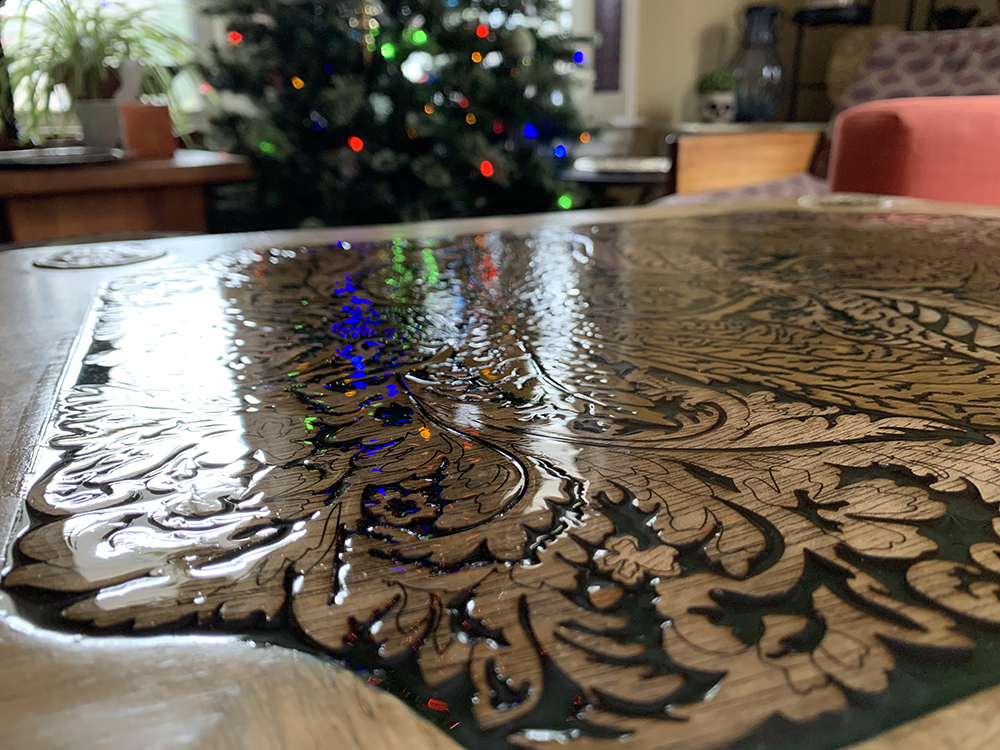
My goal from the start had been to make some kind of inset laser cut design for the middle. The wood that I had used to fill in the hole in the center of the table only came up flush with the lip on which the glass had once rested. That left 1/8″ of space between the new wood and the surface of the table. Luckily that’s a standard plywood size, and one of the easiest sizes to laser cut.

The design I made was inspired by a few different things I’d seen online—Farrow & Ball Orangerie wallpaper, House of Hackney Amarantha wallpaper, and a stag beetle design by KaleidoscopGlassArt on Etsy. I just sort of mashed all that together into something that looked kind of cool, using Adobe Illustrator, and then cut it on the Glowforge.

I didn’t mask the wood, which was a pain because then I had to clean smoke stains off a billion tiny pieces of wood, but that’s okay. I think the remaining smoke stains give it a kind of depth, and honestly I don’t know if there’s a ton of time saved between that and peeling masking tape off a billion tiny pieces of wood. I printed out the design on paper and then traced it onto the table top with transfer paper so that I could glue down each piece in the right spot. I forgot to erase the marks from the transfer paper so that’s preserved eternally under the resin.


Then I stained the table top with an oil-based wood stain that I’d bought, which turned out to be a mistake. The table top absorbed the stain strangely, leaving those curvy pale lines all over the top. I think in retrospect that those were spots where the veneer had warped and when I sanded it, my sandpaper didn’t get into the indent, leaving the old finish behind. But I ended up sanding and re-sanding multiple times to no effect. I also purchased a gel stain which was similarly useless, though it matched the rest of the table much better, and I used it on the stag beetle part of the design to distinguish that a bit.
Ultimately I’m not sure what I did to make it look okay. This is probably after two coats of oil-based stain, then multiple times sanding, then three coats of gel stain, then more sanding, then more gel stain, then more sanding, and finally a coat of polycrylic.

Lastly came the resin, which I put off for months because I was so afraid of ruining everything. I knew that the design was going to trap a billion tiny bubbles, which is the bane of epoxy artists everywhere.
I bought a coating epoxy and mixed up maybe 24 oz, which turned out to be more than I needed, and poured that on, then went with a toothpick to poke into all the tiny holes and get the air bubbles out. I set a timer and every ten minutes I went back with a drinking straw to blow on any bubbles that had risen to the surface in order to pop them. Contrary to what you might see on YouTube, that works a lot better than using a lighter, at least with this kind of resin. I continued to do that for probably two hours before the resin had cured enough that the bubbles couldn’t be popped anymore. Although a number of bubbles remain, they’re very minor and overall they don’t detract from the piece at all.
A few final notes:
Pro tip #1: Putting the resin bottles in hot water for half an hour before mixing the resin making it a lot easier to work with.
Pro tip #2: If you’re listening to an audiobook on your ear buds while working with epoxy, DON’T LEAN OVER THE EPOXY WITHOUT MAKING SURE YOUR EAR BUDS ARE SECURE IN YOUR EARS.
Pro tip #3: If you’re using a drinking straw to blow on the resin to pop the bubbles, DON’T FORGET WHICH END OF THE DRINKING STRAW GOES IN YOUR MOUTH.
